Manual

En esta sección encontrarás todas las instrucciones necesarias para utilizar ClickSign.

Other setup options


Increase the reserved memory

You can use it if you want to sign large PDF files such as a 70 MB file, we will see how to reserve 1024 MB of memory because by default it reserves 512 MB and it is not enougth to sign those kind of documents.

On Windows

Go to \Program files\Isigma\ClickSign\ and edit the file ism.properties appending the property: java.memory.max=1024

On Linux

Edit the file $HOME/clicksign/menu/_run.sh and modify the property MAXHEAP setting the value 1024m


Setting up an outbound proxy

Some ClickSign electronic signature functions requires validation. If your connection is through a proxy you have to setup it with the following instructions:


Go to the "Setup" from ClickSign's menu.

Configuración de Clicksign para firma digital


On the network tab of the setup menu tick the checkbox "I use a proxy to access the Internet". Now set your network parameters as you require. To finish press apply or OK to save your changes.


Configuración de la red para el software de firma digital Clicksign

ClickSign's diagnostic

If you want diagnose ClickSign on your machine today is easier than ever. Just open Clicksign's setup, on "Diagnostic" tab the information that support technicians will need is shown.

Diagnóstico de Clicksign


Electronic signature device configuration

Clicksign Plus and Clicksign Pro lets to you choose between the signature you will use.

These devices represents digital certificates on hard disk or smart card. Inside of the hard disk certificates there is the particular case of the Windows installed certificates. To sign with those certificates you have select the "Windows Crypto Api" device.

1. Select the ClickSign menu entry "Setup"

Configuración de Clicksign para firma digital

2.  The following dialog will be shown:
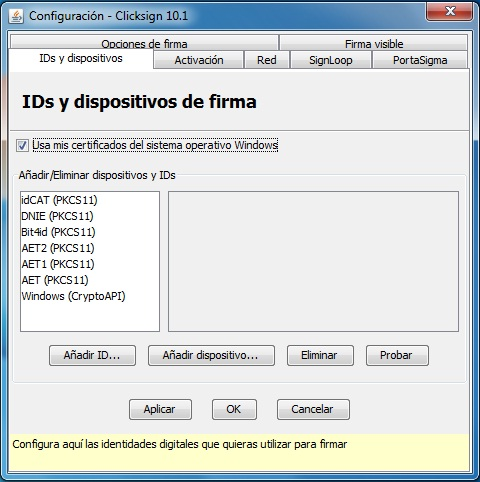
Certificados y dispositivos electrónicos para firma digital

Add ID

This option lets to you add software digital certificates, most commonly PKCS#12 formatted. We just have to browse by the file system and select the certificate.

Add electronic signature device

This option lets add criptographic devices (Smartcards or Tokens). For example, ClickSign is compatible with some of their by default but is possible to add any other developed over PKCS#11 standard. Just select the DLL provided by the device manufacturer.

Delete

This option lets delete any listed device. Just select the device and press "Delete" button.

Test

This option lets test if the electronic signature device works. Just select the device and press "Test" button. A dialog will be shown with the certificate behavior.